Thursday, December 15, 2016

Unit 5 Reflection

Throughout this unit, we learned about the Central Dogma, which is the many processes in which proteins are formed.
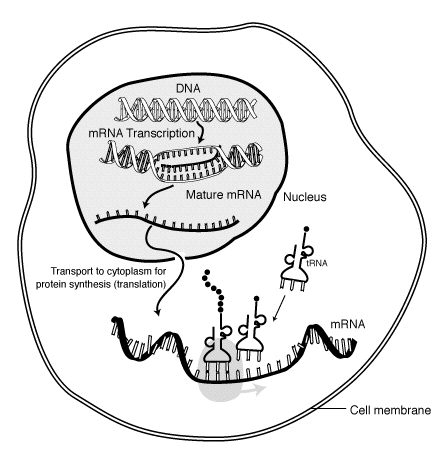
First the DNA unzips. Then the mRNA attaches to the unmatched bases. But as it attaches, it replaces the thymine with uracil. Then the mRNA detaches from the half of the DNA and the DNA zips back up. The mRNA then leaves the nucleus through the nuclear pores to go to the cytoplasm. That entire process is one part of protein synthesis and is called transcription.
Then, after the mRNA comes to the cytoplasm, it attaches to the ribosome, where it reads the bases in triplet groups called codons. The mRNA starts with the start codon signalling the ribosome to start reading it and the stop codon in the end signals the ribosome to stop reading the sequence. While the ribosome reads the sequence, the tRNA then brings the amino acids, which then attach to each codon. Eventually an amino acid is attached to each codon in the sequence where it then detaches from the mRNA and tRNA. This process is called translation. The mRNA is then sent back through the nuclear pores where it is recycled in the nucleus and the tRNA is sent back to the cytoplasm where it is recycled there as well.
amino-acids-metabolism-figure-2-149BBF6DDD969BAB1D1.png
Finishing off the protein synthesis process, the amino acids then bond together to form a protein. The protein is then sent off to the rough endoplasmic reticulum and then sent to the Golgi apparatus where it is then shipped out of the cell using vesicles to help the body function.
Unknown------------666.jpg
This unit really brought together all of the concepts from day one, because everything we started was finished, meaning that in a cell, we learned what each of the organelles do in previous units. Then we saw how the organelles contribute to the creation of proteins and how proteins are necessary. We then finished off with how proteins are made specifically and how after the mRNA and tRNA is recycled and the finished proteins are sent back to be used by the body. This unit really brought everything full circle.
However although I say that this unit really brought everything full circle, it took me a while to really understand how this related to what else we learned in this unit, which was one of the struggles that I had to face throughout this unit. But by using what I learned in the VARK Questionnaire that I took last unit, I learned that diagrams and visuals were helpful to me, which is why by making diagrams and writing out the whole process I was able to connect the concepts.
I struggled with wondering with what happens next. For example, I wondered where exactly tRNA came from but also where it goes after the amino acids bond.
But my strengths came after my initial struggle. My being able to understand how everything came together was a strength because it helped me understand the concepts better.
I still want to know more about RNA. During this unit it was brought up that a ribosome actually is just a bunch of RNA, which is a little bit hard to grasp still.
I consider myself a better student than I was in the previous units, because I learned how to use my strengths to my advantage. Since I am more of a visual person, I drew out all of the diagrams and wrote out all of the processes. I know how to study better, which is a skill that I can use not only in the science class but outside it as well.

Wednesday, December 14, 2016

Protein Synthesis Lab

In this lab, we asked the question, “How does the body produce proteins?” In the protein synthesis process, there are two steps — transcription and translation. Transcription occurs first, where one strand of the DNA is copied and makes RNA. Then the base thymine is replaced with uracil. After, the RNA is transported to the cytoplasm, where translation occurs. The ribosome in the cytoplasm reads the RNA in groups of three, or codons, where it forms amino acids. The amino acids then bond together to make proteins.
MRNA-interaction.png
Changing bases in the DNA molecule result in either frameshift mutations or substitution. The frameshift mutations include insertion or deletion where a base is either added or deleted, and substitution replaces a base for another. In this lab, I noticed that the frameshift mutation had the most amount of change comparing it to substitution because by adding or deleting a base, the entire sequence is shifted and therefore changed, but in substitution, the one base that is being substituted is the only one being affected, so it wouldn’t affect the sequence by a great deal. However, the mutations are the most problematic and harmful when they occur at the beginning of the sequence, because the start codon could be changed, due to mutations, into the stop codon, making the amino acids unable to form into a protein.
26855220782_ff1e86c474_b.jpg
In the experiment, I observed how the substitution mutation would affect the sequence. I substituted the start codon for a stop codon, which invalidated the protein because the protein was never able to form as it started with a stop codon, signalling the stopping of the process. Although this mutation greatly affected the protein, it was only because of where it occurred, rather than how the mutation occurred. Since only the first three bases were substituted, nothing happened to the rest of the codons as they stayed the same. But due to where the mutation was placed, it affected the protein, as the mutation I tested substituted the start codon for a stop codon.
FullSizeRender-3.jpg
Mutations are so common in life. However these mutations can have dramatic effects that can put the individual at great risk, or it can barely affect that individual at all. For example, the fatal disease called Tay-Sachs disease comes from the frameshift mutation on the gene that converts the alpha-subunit of the lysosomal enzyme, beta-hexosaminidase. This frameshift mutation is the cause of Tay-Sachs disease and cause the destruction of the nerve cells in the spinal cord and the brain, which has been shown to be fatal.

Notable_mutations.png

Tuesday, December 6, 2016

Human DNA Extraction Lab

In this lab, we asked the question, “How can DNA be separated from cheek cells in order to study it?” I found that after the cold isopropanol alcohol was added to the solution, the DNA was separated. In order for the DNA to be separated from my cheek cells, I homogenized the cell tissue with the gatorade and the saliva, I washed the solution out with soap during the lysis process, then I added the salt and the pineapple juice facilitated the precipitation process as they broke down the remaining histones, and lastly to separate the DNA from the cell, I added the cold isopropanol alcohol to the solution. During the homogenization, lysis, and precipitation processes, the cells started to become visible and eventually the individual DNA molecule started to become visible. The claim that the alcohol is what caused the DNA to separate from cheek cells could come from the knowledge that DNA is polar and the alcohol is nonpolar. Since the DNA separates after the alcohol is added because of the clash in the polarity, it would support my claim that after the cold isopropanol alcohol was added to the solution, the DNA was separated.
While my hypothesis stating that the alcohol will cause the DNA to separate was supported, there could have been errors. Some of the errors that occurred that could have affected the outcome was when after the pineapple juice was added, the mixing process led to some of the solution spilling out of the tube due to the ineffective cover that was placed on the test tube that could have led to some important molecules that affected the effect of the enzyme on the DNA extraction process. The second error that occurred had to do with the amount of alcohol that was put into the solution. Since I didn’t measure the exact amount of the alcohol and instead put an estimated amount of alcohol, it could have led to affecting the molecule of DNA. In order to prevent these mistakes in the future, I could use a better stopper for the tube that covers the tube in a way so none of the solution spills out. In addition, to prevent the harming of the DNA, I could measure the amount of solution I had and then measure exactly the same amount of alcohol to add to the solution instead of estimating the amount of alcohol. So mainly, both of my mistakes could be prevented by being more accurate.
This lab was done to show how DNA is extracted and the different visible stages in which the DNA goes through during the extraction process. This lab relates to what we’ve learned in class because currently we are studying DNA and its replication process, so through this lab, we were able to see the most basic of the processes, the DNA being extracted. This could be applied to future situations because if I go into a field of genetics, then DNA extraction along with far more complicated procedures would be what I would do.